Hardware configuration
Final Assembly
Testing the System
Supplementary Scenarios Using the Same Inventory
Alternatives
Although it may seem complex at first glance, the automatic garden watering system I built is actually quite straightforward. It pumps water from a 20-meter-deep well into a 1.000-liter tank positioned 4 meters above ground. From there, gravity allows the water to flow and irrigate the entire garden without any additional energy consumption or cost. An added benefit is that the water reaches the plants at a more moderate temperature, unlike the colder water drawn directly from the well. Previously, I achieved good results watering plants located 20–30 meters away from a tank positioned just 2 meters above ground.
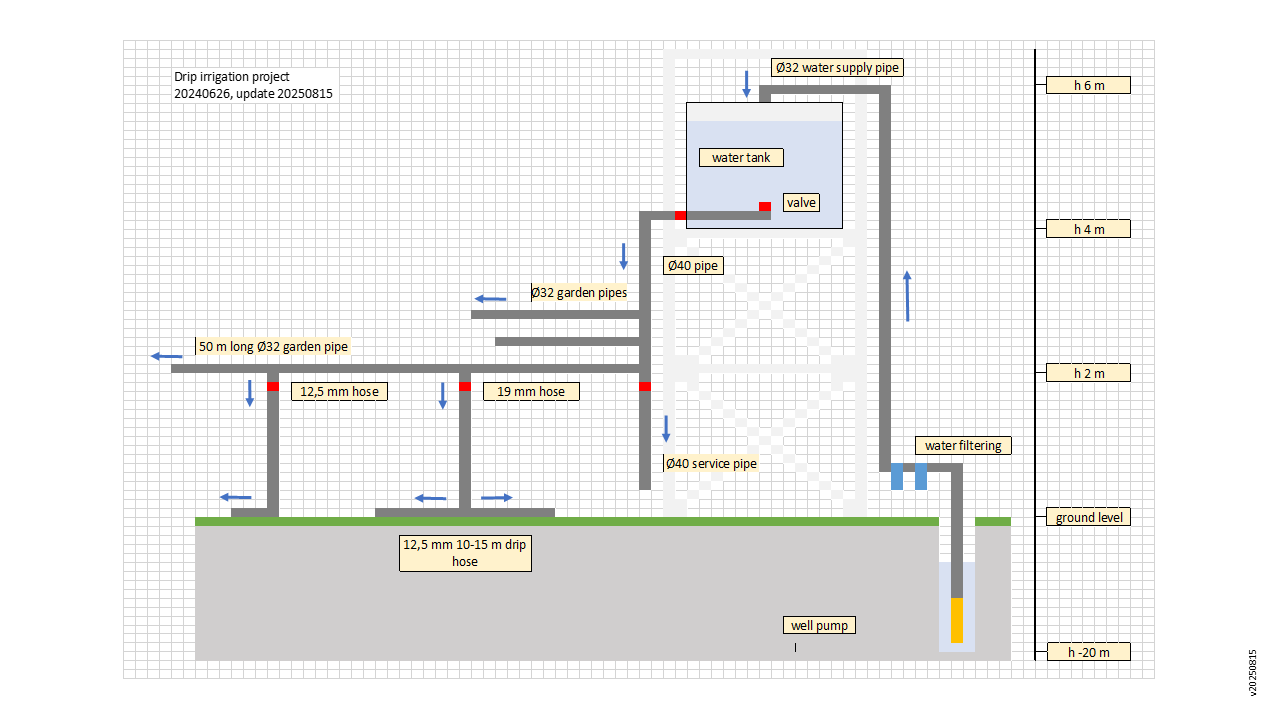
Due to low water pressure, the system is not suitable for lawn sprinklers. However, it works effectively in all types of drip irrigation setups.
Pipe and Hose Inventory List: PEHD PE100 PN10 Pipe Ø40 mm PEHD PE100 PN10 Pipe Ø32 mm 19 mm Hose 12.5 mm Hose 12.5 mm Drip Hose
Inventory List:
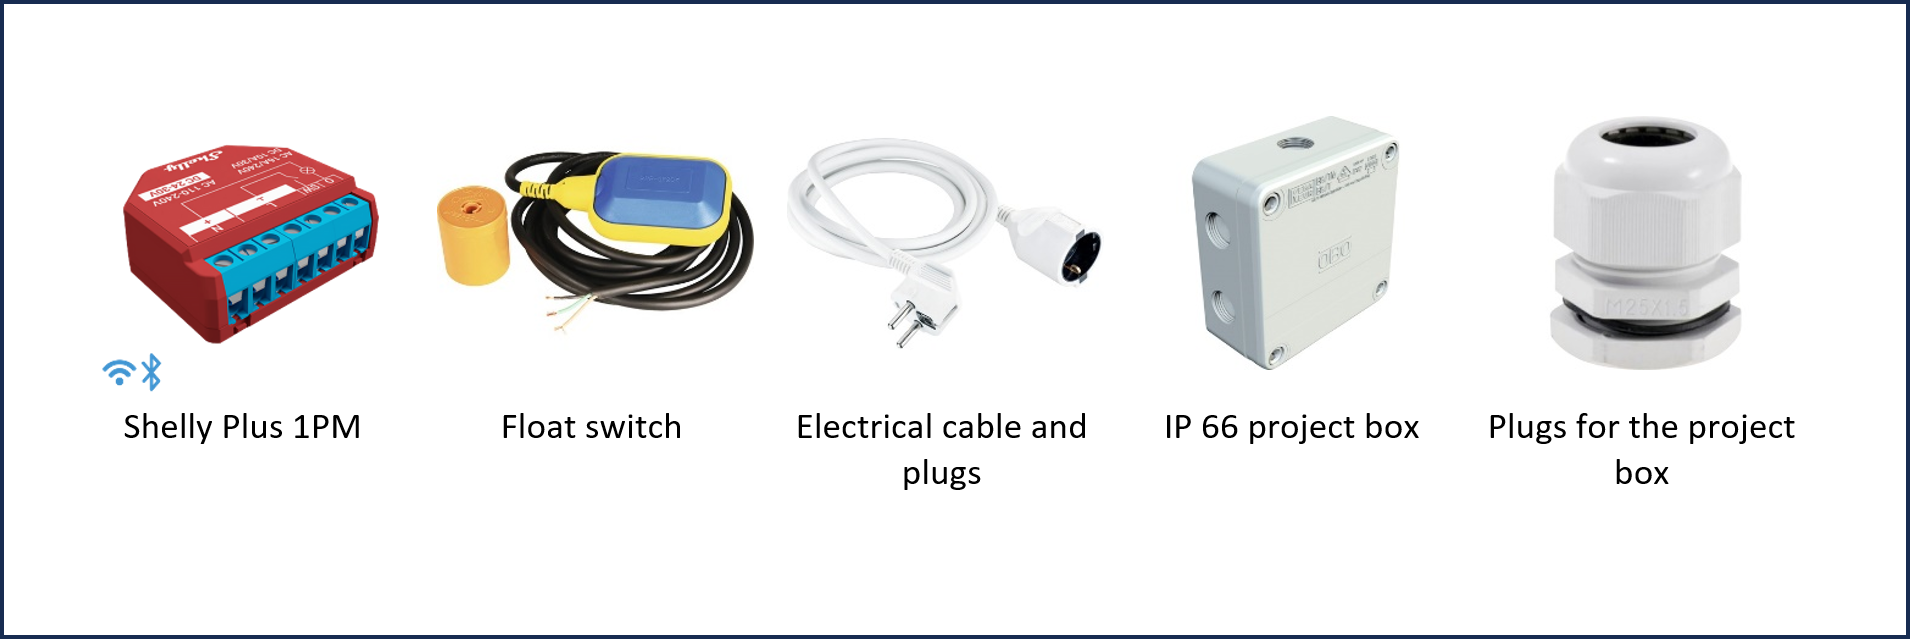
- A Smart Switch - I chose a Shelly Plus 1PM switch because it can function as a standalone device with access via a web interface. Shelly products support MQTT, which I use to integrate with other projects. Additionally, the Shelly Plus 1PM monitors power consumption and can be expanded with the Shelly Plus Add-On to support temperature sensors. As an alternative to the web interface, you can monitor and control the Shelly Plus 1PM remotely via the Shelly Smart Control app or Home Assistant. Shelly Plus 1PM also functions as a Wi-Fi range extender, which is useful for improving network coverage around the garden.
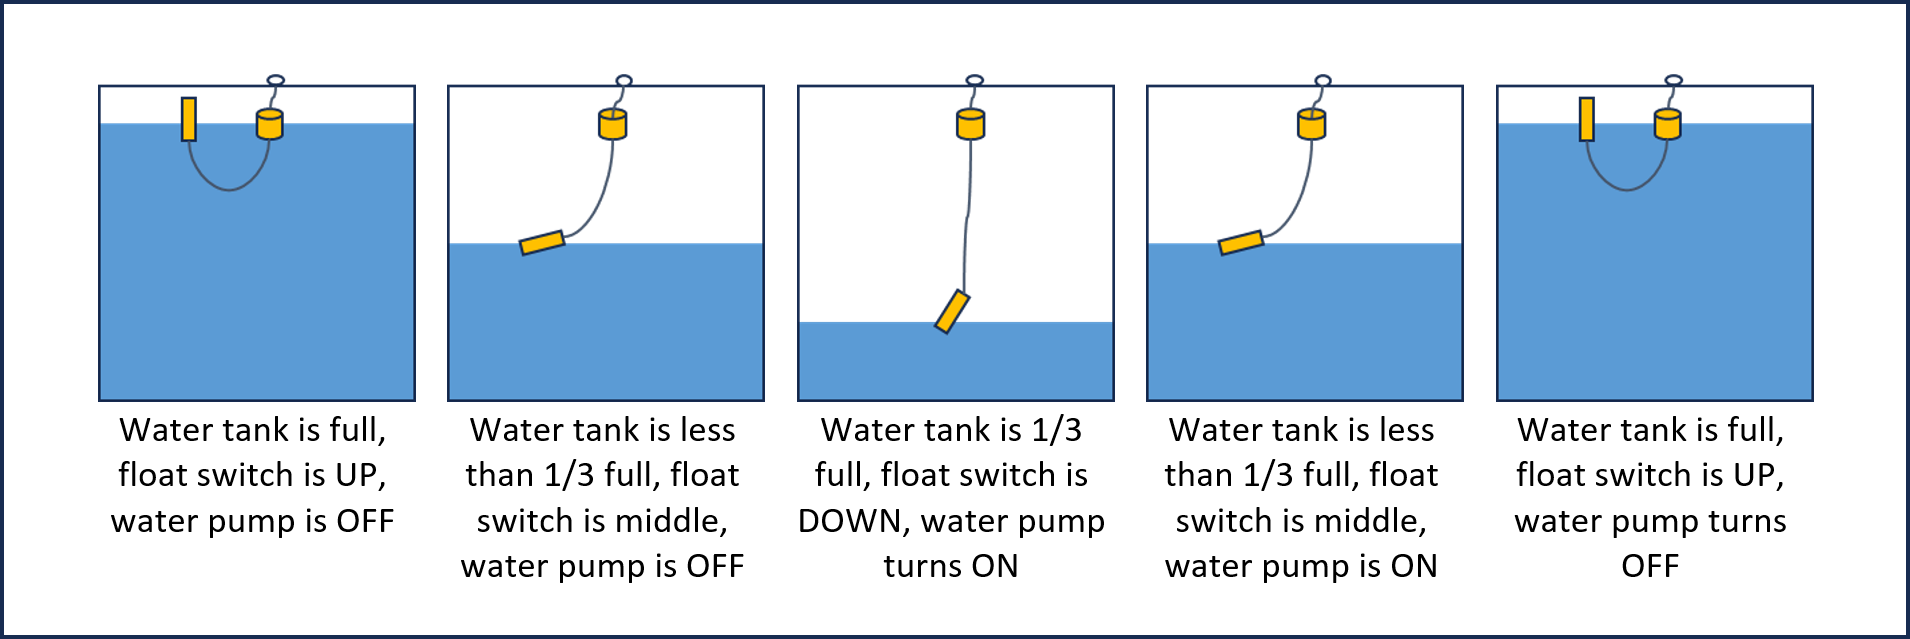
- A Float Switch - Used to detect water levels and control pump operation.
- An Electrical Cable and Plugs - I found it much easier to work with an IP44-rated extension cord, which I cut in the middle to wire into the system.
- One IP66 Project Box - Used to safely enclose and protect the electrical connections from outdoor elements.
Optional Components:
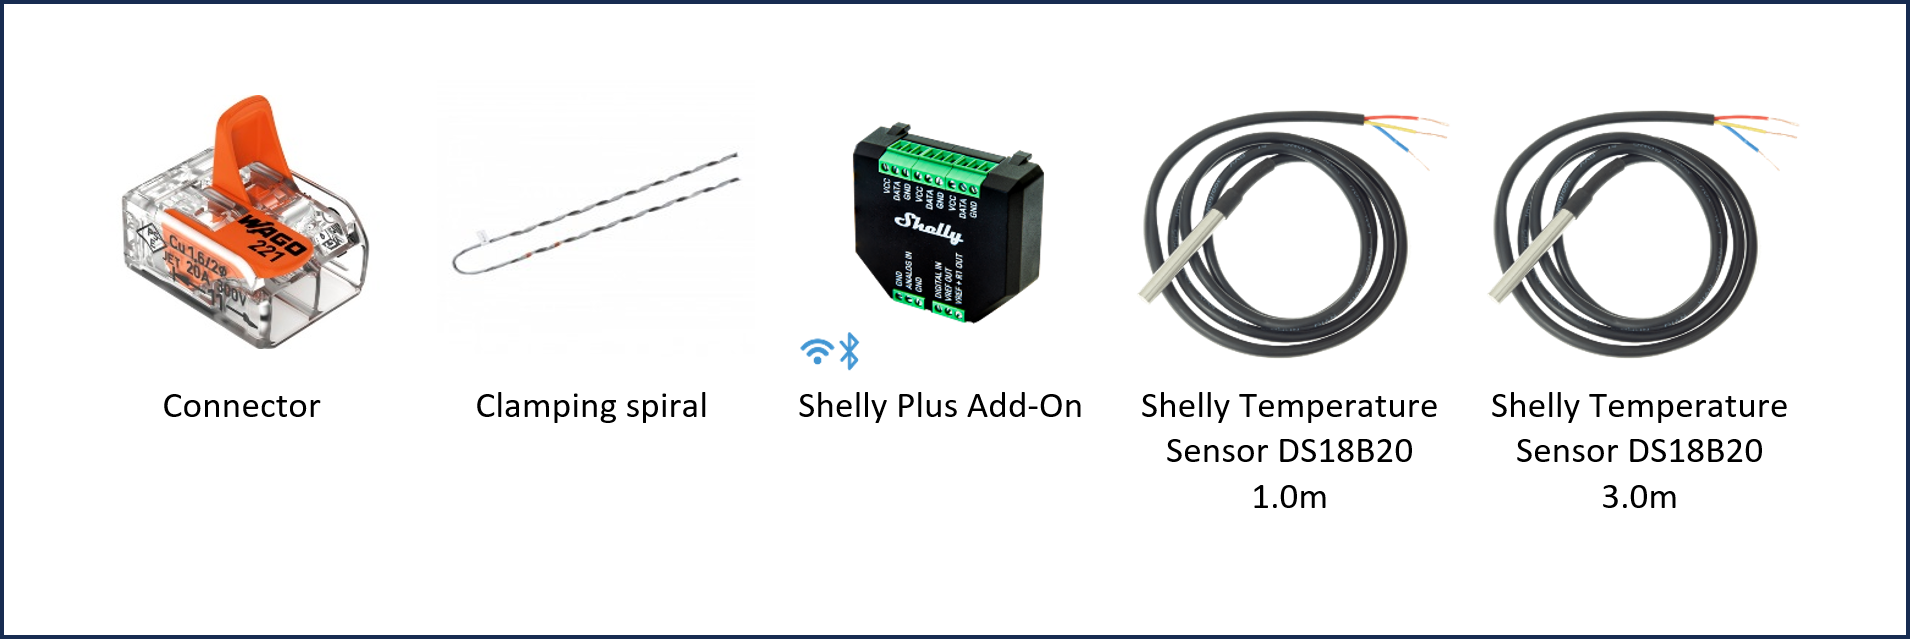
- A Cable Connector - Used to safely connect the electric wires.
- A Clamping Spiral (for Optical Fiber) - helps secure the float switch and temperature sensor cables to the water tank. Prevents cable wear over time caused by movement or swinging in the water.
- 2 Temperature Sensors - Allows monitoring of both the water temperature inside the tank and the ambient temperature outside. I used the DS18B20 3.0m sensor for the tank and the DS18B20 1.0m sensor for the outside, both connected via the Shelly Plus Add-On.
Always refer to the official wiring guidelines provided by the manufacturer of your smart switch. Even within the Shelly product line, wiring instructions may vary between product versions or releases. For your safety and to ensure proper functionality, consult the latest official documentation before installation.
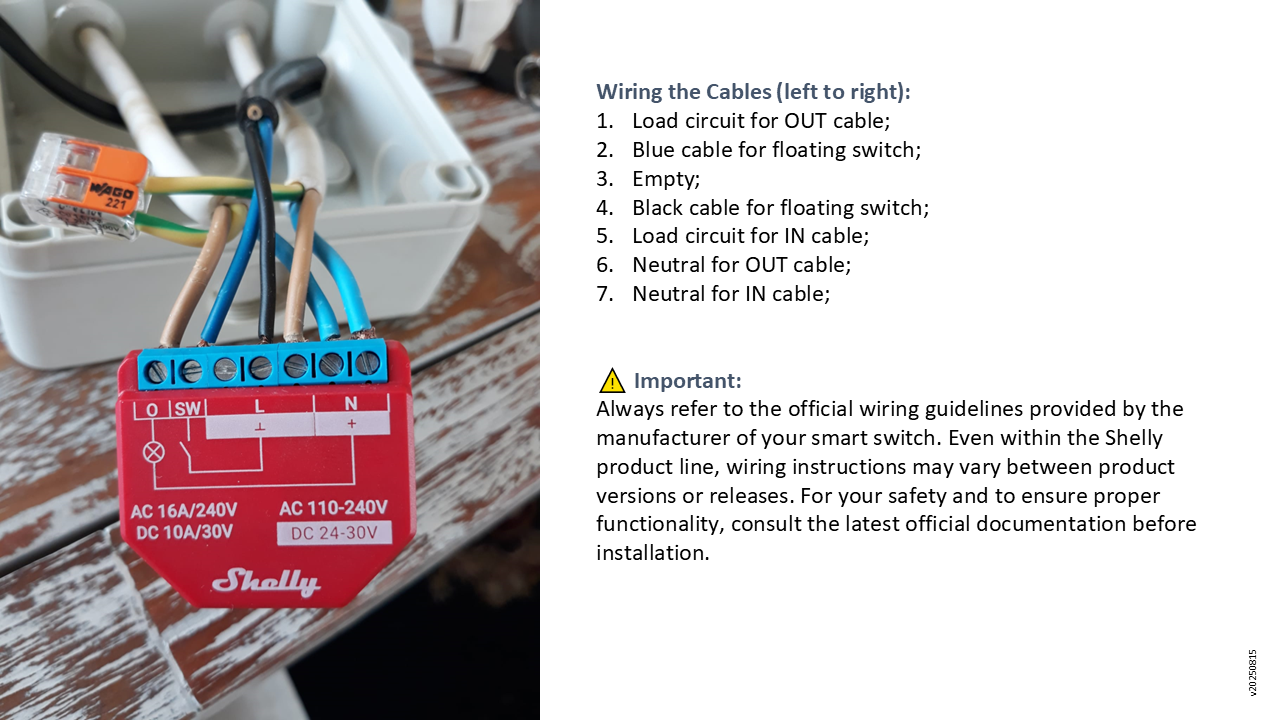
For this project the wiring from left to the right was done as follows:
- Load circuit for OUT cable;
- Blue cable for floating switch;
- Empty;
- Black cable for floating switch;
- Load circuit for IN cable;
- Neutral for OUT cable;
- Neutral for IN cable;
The float switch used in this project has three wires, but only two are required — typically a combination of black and red or black and blue. Always refer to the specific wiring instructions provided with your float switch to determine the correct configuration. If you accidentally switch the wires, there’s no issue: the Shelly Plus 1PM includes an "Invert" option that allows you to reverse the input logic in the software settings. For the ground wires (both IN and OUT cables) I have used a clamp.
Supplementary step to connect the temperature sensors: I have connected the two temperature sensors to the Shelly Plus Add-On and then assemble with Shelly Plus 1PM.

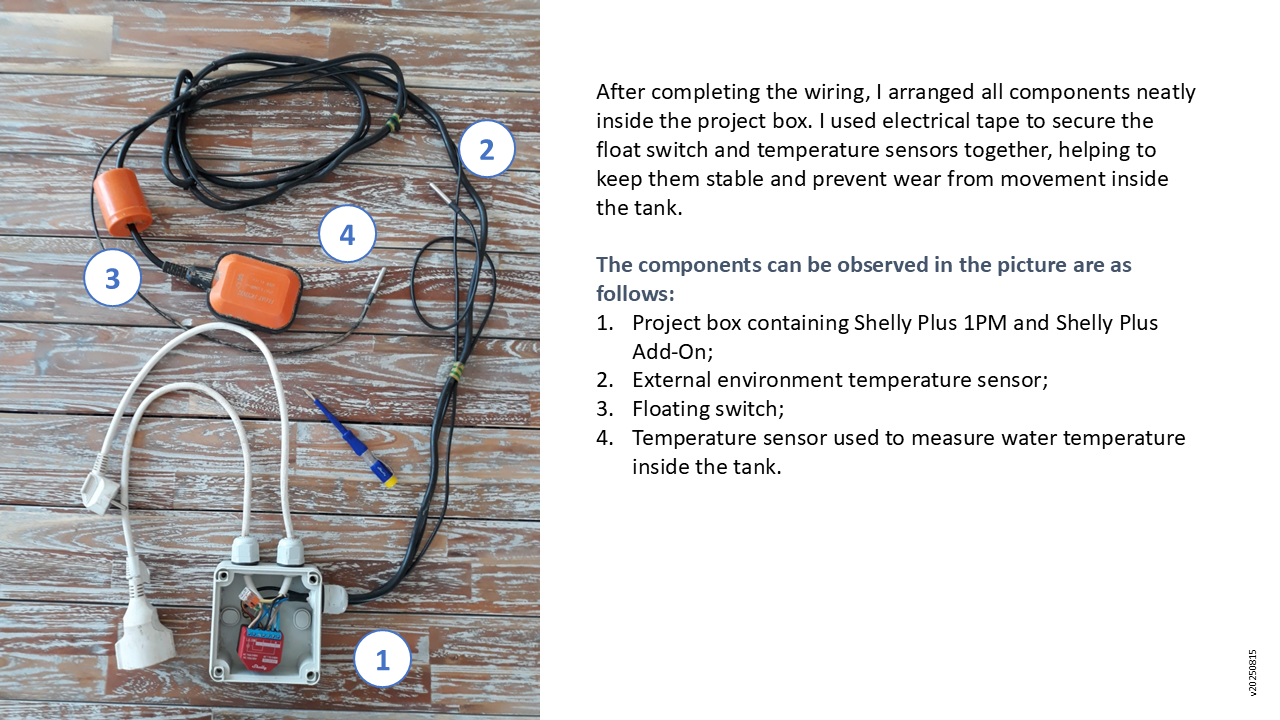
After completing the wiring, I arranged all components neatly inside the project box. I used electrical tape to secure the float switch and temperature sensors together, helping to keep them stable and prevent wear from movement inside the tank. The components can be observed in the picture are as follows:
- Project box containing Shelly Plus 1PM and Shelly Plus Add-On;
- External environment temperature sensor;
- Floating switch;
- Temperature sensor used to measure water temperature inside the tank.
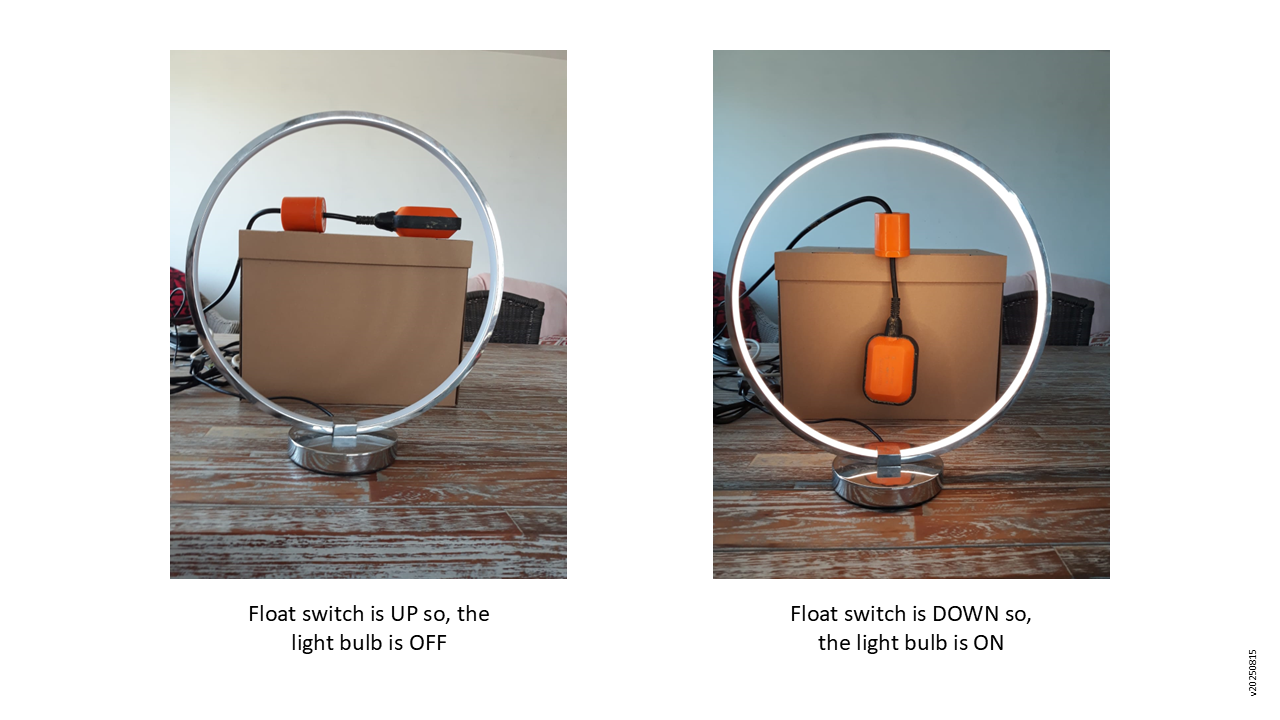
To verify the float switch functionality, plug in a lamp (or another low-power device). Change the position of the float switch and observe the lamp's behaviour. When the float switch is UP (tank is full), the lamp should turn OFF. When the float switch is DOWN (tank is low), the lamp should turn ON. This confirms the correct logic of the float switch input. If the behaviour is reversed, you can swap the wiring position of the float switch cables, or use the "Invert" option in the Shelly interface to reverse the input logic without altering the wiring.
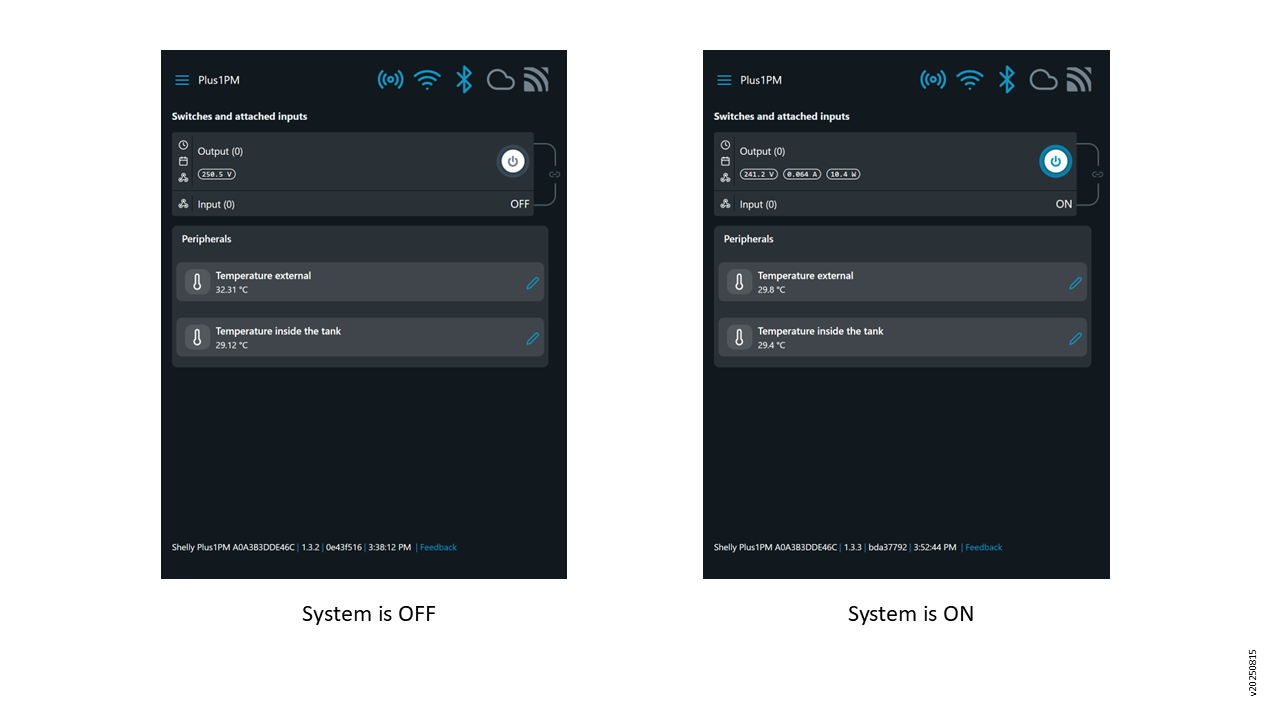
Additionally, the system’s ON/OFF status can be viewed in real time via the Shelly Plus 1PM web interface.
- Turn ON the water pump only when outside temperature is above 10oC. Outside temperature can be measured accurately with the optional temperature monitoring parts or can be obtained automatically from the meteoritical service; (the scenario will allow to avoid watering during late autumn, winter, and early spring when watering it's generally unnecessary)
- Turn ON the water pump only during day time. This ensures that if any incident occurs, the pump can be turned off manually while it is still visible and accessible.
- Do not turn ON the water pump if in the next 12 hours rain is forecasted by the meteorological service. Weather data can be obtained through a meteorological service to avoid unnecessary watering and conserve water.
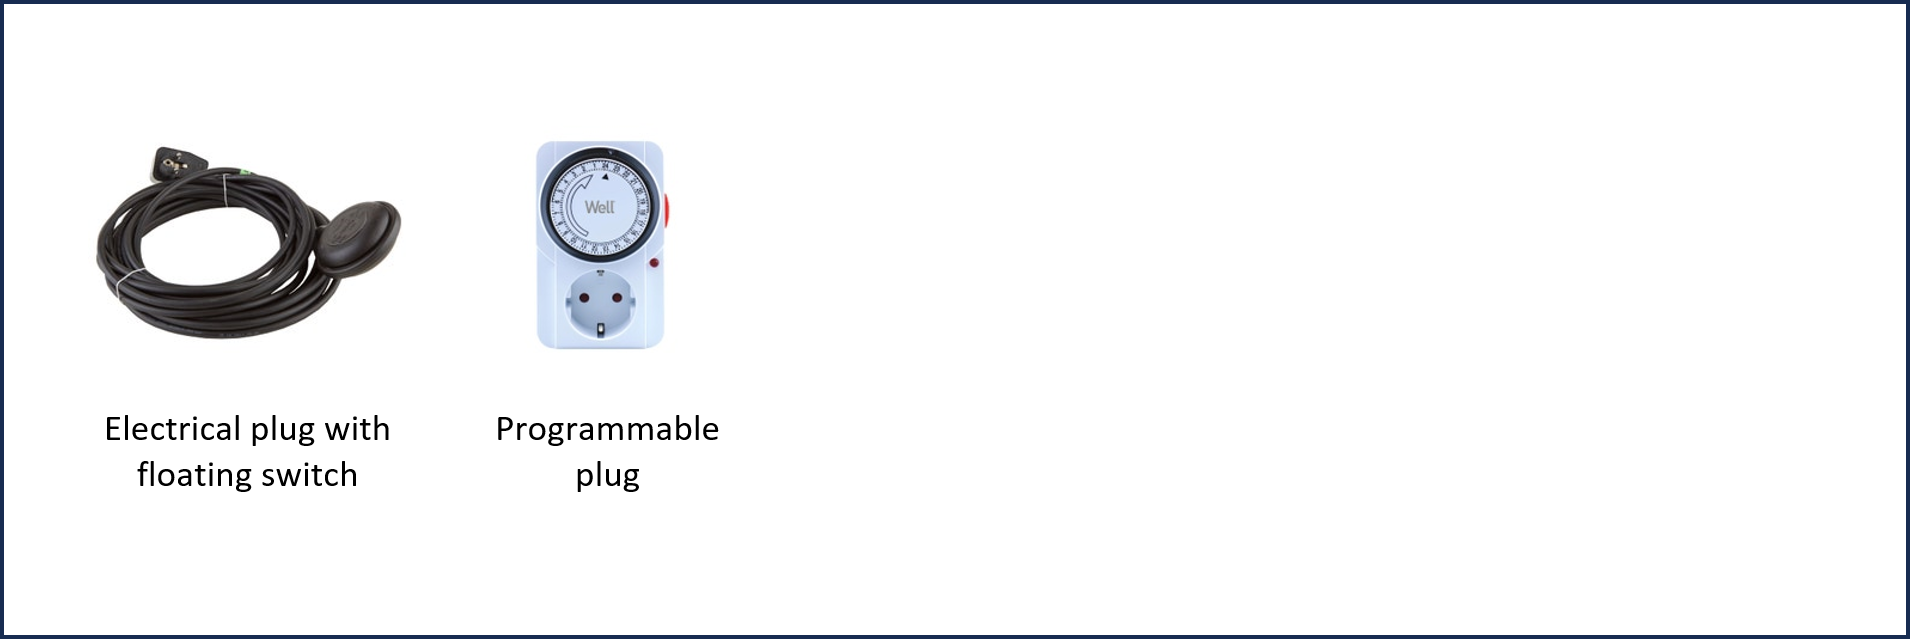
You can use an electrical plug that includes a built-in float switch together with a timer. This setup provides a basic level of automation and can be suitable for straightforward water pump control.
However, using such a solution means you won't benefit from the smart features offered by the Shelly Plus 1PM, such as:
- Remote control via app or web interface;
- Power consumption monitoring;
- Temperature sensor integration;
- Smart automation based on weather, time, or environmental conditions;
- MQTT and Home Assistant compatibility;
| Powered by: |
Accesați pagina web www.HelpBus.online și căutați cea mai recentă versiune a acestui document,
sau faceți clic pe linkul de mai jos dacă citiți acest text pe un dispozitiv electronic:
Follow Me on HelpBus.online
DIYs Off the Shelf / Automatic drip irrigation